Showing posts with label COOKING. Show all posts

Sunday, 21 October 2012

YAM Fries

I can remember the first time that I ever tried Yam Fries. They have become so popular in restaurants. I couldn't resist trying to make them myself. These turned out so good that we have made them several times since the first.


The recipe is so easy and few ingredients are needed, which I always like.

Ingredients:

1 large yam
1-2 tbsp corn starch
3-4 tbsp olive oil
Salt and pepper
Large ziploc bag (or something similar)

* This will yield 2 large portions.

STEP ONE:

Peel the yam and cut into strips. *Be careful while cutting the yam up as it is quite tough


STEP TWO:

In a large ziploc bag toss in 1-2 tbsp of corn starch and the yam strips, seal the bag and shake it until the yams strips are completely coated.


STEP THREE:

Pour in the olive oil and add salt and pepper; shake bag again.

STEP FOUR:

Evenly spread the yam strips onto baking sheets (you will need two sheets). Spread them so they are spread in a single layer and the majority of yams are not touching one another. If they are piled on, the yams will steam and won't crisp up.


STEP FIVE:

Place in the oven at 425 F for 30 minutes; toss them half way through. Continue baking until your desired crispness.

STEP SIX:

Pair with a dipping sauce - whatever you want. We used a spicy chipolte mayo.

STEP SEVEN:

Eat, eat, eat, eat, eat, eat, eat!!


Friday, 15 June 2012

Potato Bacon Soup!!

Once again, it has been way too long since my last post. I hope to make the next few great ones to help make up for it.

So...without further ado: Today's Post - Potato Bacon Soup!!


This is the easiest soup you will ever make - so try it!

Ingredients:

6 potatoes, chopped into small pieces
1/2 package of bacon
1 large onion, diced
2 celery sticks, diced
kernels from 1 cooked corn
900 ml vegetable stock
1 tbsp pepper
STEP 1: 
Cook bacon; dry with paper towel


STEP 2: 
Prepare celery, onions, bacon and corn


STEP 3:
In the same deep pot (to avoid too many dishes), add chopped onion; cook until browned 


STEP 4: 
Add vegetable stock; bring to a boil

STEP 5:
Add chopped potatoes; turn to medium heat and continue cooking until potatoes are tender


STEP 6:
Remove half of the potatoes temporarily and slightly mash the remaining soup to create a 
creamy texture; add the rest of the potato pieces back in
(This doesn't look every appetizing but you just have to look at it briefly)


STEP 7: 
Add chopped bacon, celery and corn; continue cooking on low until you are ready to eat!!!!


And that is it!! It is so quick and so easy to make! It is also very hardy and filling. It's a great soup to make a ton of and freeze into individual containers for lunches or dinners later on.

****I cooked the corn on the cob separately and then filed the kernels off and put them in the soup. Alternatively, you could probably file the kernels off without cooking it and just add them raw to the hot soup. OR you could just use a can of corn. Whatever you have will be just fine!!


NOW on a completely different note - I wanted to say 'without further ado' (as a I did up top) but I wasn't sure of the spelling so I looked it up and apparently people get 'ado' and 'adieu' mixed up....read on if you care.... So 'ado' means a flurry or fuss whereas 'adieu' means goodbye in French and has nothing to do with the phrase 'without further ado' UNLESS you want to say 'without further adieu, I'm out of here' ('without further goodbyes, I'm out of here') because there would never be a need to say without further goodbyes period - you need to finish the sentence. Just thought it was interesting. Google is great.


Thursday, 3 May 2012

Pizza Pizza!

When we buy tortillas we always have way too many left over from the original purpose of buying them. There are so many in a package! After 2 or 3 meals of using them in some way or another we are all tortillaed out.

Solution: They actually freeze great so if you don't want to live off of them for a half a week like we were doing, pop them into the freezer and save them for another day.

Recently, we made a make shift vege pizza with the frozen tortillas. It was so good because we (me more than Josh) love thin crust and that's exactly what it was.

If coming from a frozen state, let the tortilla sit out of the freezer for an hour before you plan to use them.

Pre-heat oven to 350 F and top your pizza with anything that you like and whatever you have in the fridge.

We used pasta sauce instead of pizza sauce (can was already opened), green onions, yellow onions, green peppers, and topped with lots of mozzarella cheese.


Place on a cookie sheet and cook until the cheese is nice and melted and the edges are starting to brown up. I believe this went in for about 10 minutes but every oven is different so just monitor it.


It was crunchy and delicious.

Mini homemade pizzas also taste great on pita bread and make nice individual sized ones.


Monday, 30 April 2012

Chicken Lasagne Rolls - YUM!

So I'm not the best at following recipes and I always add a little bit of this and a little bit of that, so the ingredients and amounts aren't going to be exact. Unless it is for cake batter or something of the sort I would highly suggest cooking this way as well - it makes it your own.


INGREDIENTS to make 6 rolls:
6 lasagne noodles
1-2 chicken breast - depending on how meaty you want it
1 large can of diced tomatoes (and liquid)
1/2 can tomato paste
1/2 of a large onion - diced
1 large pepper - I used yellow for the sweetness - you could use any
1 tsb or so oregano
1 tsp or so basil
1 tsp or so thyme
1 tsp or so pepper
1 cup of grated mozzerala cheese
 handful of cut parsley

When I cook it really depends on what I have in store. Make subsitutions, change the amounts - really anything goes.

STEP 1
Boiling water. Once boiled, add noodles - cook until tender. 
If you want them out of the water sooner than they are done for some reason, that is fine because they will continue to cook in the oven. Oh! Pre-heat oven to 375 F.


STEP 2:
Grill chicken breast - I just do it on a little George Foreman grill, but you could even cook it in the oven - it doesn't have to be grilled, it just adds a bit more flavour.


STEP 3:
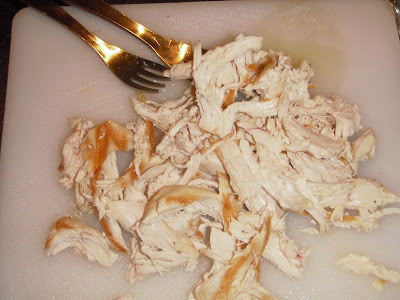
Let chicken cool for 5 minutes so the juice reabsorbs. Then shred apart. I like to use two forks.


STEP 4: Picture missing - forgot to take one I guess!
Make the sauce.
Bring to a boil the diced tomatoes and liquid, tomato paste, onion, pepper, and herbs (only use half of the parlsey, use the rest for garnish). Once boiled, dropped down to a simmer and allow the sauce to thicken.

STEP 5:
Assemble.
Lay out each noodle. Add a few pieces of cheese to help everything stick together. 
Add a layer of sauce, then several pieces of chicken and some more cheese.


STEP 6:
Roll each one up. You'll be so proud of yourself. I know I was!
 Missing a picture again - but you get the idea I'm sure.

STEP 7:
Place in oven safe dish and add a dollip more of sauce to the top of each roll. Add the remaining
cheese - can't ever be too generous - pile it on!


STEP 8:
Place in oven for 20-30 minutes at 375 F. Just monitor it, you really just want it to set and have the cheese crisp up a bit.


STEP 9:
Garnish and plate it up for your man! (or whom ever!)


Enjoy!! Let me know how yours turns out!