Monday 30 April 2012

Growing Green Onions from Scraps

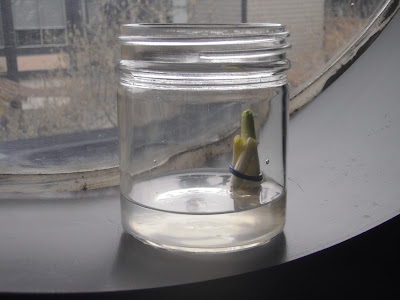
Who knew? I sure didn't! But you can take the bottom root piece of that green onion you just cut up for your nachos and re-grow it!!! Am I the only person who thinks this is amazing?

All you have to do is take that bottom piece - it really doesn't matter how dried up or small it is, it will refresh itself - and place the root in shallow water and watch it grow.


Just break off what you need and they will continue to grow!

*I thought I would get more bang for my buck by cutting one root end in half and have it grow into two but it doesn't seem to be working for me - it has been sitting in water for over a week and there haven't been any sprouts - I could have just separated it in an awkward spot though. Does anyone know if this can be done?

Easy Caramel!

This is the easiest recipe ever to make CARAMEL!!! I was extremely surprised at the turn out of this. I just couldn't believe that Condensed Milk could magically turn into sweet gooey caramel. I made one can with the intention to use over Cheese Cake and then I had to make another can for it because I ate it all! Actually to make myself feel better - my sister and I ate it all.


It tastes like old fashion caramel, the kind that gets wrapped around green apples or a much softer version of MacIntosh caramel - you know the candy that comes in the red and green plaid box?

Apparently this trick of turning milk into caramel is a big no no - it says so right on the can! We'll sort of...It says 'do not heat can' and that is exactly what had to be done.

INGREDIENTS: 1 can sweetened condensed milk

STEP ONE:
Remove label off can.

STEP TWO:
Place can in water on stove so that it is fully submerged.

STEP THREE:
Boil.


STEP FOUR:
For 4 hours!

You need to monitor this...not constantly, but enough so that you can check on it every 15 minutes or so to top off the water. If the can is not fully submerged at all times the pressure building in the can can cause it to pop open! (hence, the warning of do not heat).

I tried to not bother the pot too much because I was scared that it might blow up so other than adding water to the pot I pretty much just let it do its thing.

10 minutes of cooling...and then open it up to this lovely surprise!


On side note: The caramel is formed well enough before 4 hours (I did one for 3 hours and another for 4) but I just found that leaving it in for 4 hours caramelized the sugars a bit more, leaving some bits (the ones that lined the can) extra chewy - an added bit of texture. But if you are pressed for time, I must say the 3 hour can tastes excellent as well.
From experience, it's best to have a plan of use with this stuff or else the temptation of it just sitting there once it's done will get the better of you (if you're like me).

*Keep Refrigerated.

Apparently, this use to be an old trick back in the day and it makes perfect sense - it is such a decadent treat that takes minimal effort and is inexpensive. I am happy to have found out about it! I will definitely continue to make this.

Intro to Our Home

Josh and I have been together for just over 4 years now. He grew up in Vancouver, which is a complete contrast to where I grew up - up north in a small town. Two summers ago we moved in together to a beautiful condo....only problem was....we were paying someone elses mortgage payments!! The price of rent was almost double of what we were paying separately while living apart. I couldn't justify it and set a hopeful 1 year limit to staying there. Josh had the view that everyone rented if they lived here, and my view was the opposite - I needed to buy a place! As a young couple (26 years - me and 31 years - Josh) we could only afford so much, especially in the area that we were living. The only solution was to move outward - Burnaby is where we call home now.

We compromised between location, age of building, size and price. We could have A) stayed in Vancouver and bought something within our price range within a newly (or nearly new) condo that was a tiny one bedroom or B) do what we did and bought a suite outside of Vancouver in an older building for the same price but double the size!

As of October 2011 we are very happy to be official homeowners!!

I'll post pictures to share in a bit!

Chicken Lasagne Rolls - YUM!

So I'm not the best at following recipes and I always add a little bit of this and a little bit of that, so the ingredients and amounts aren't going to be exact. Unless it is for cake batter or something of the sort I would highly suggest cooking this way as well - it makes it your own.


INGREDIENTS to make 6 rolls:
6 lasagne noodles
1-2 chicken breast - depending on how meaty you want it
1 large can of diced tomatoes (and liquid)
1/2 can tomato paste
1/2 of a large onion - diced
1 large pepper - I used yellow for the sweetness - you could use any
1 tsb or so oregano
1 tsp or so basil
1 tsp or so thyme
1 tsp or so pepper
1 cup of grated mozzerala cheese
 handful of cut parsley

When I cook it really depends on what I have in store. Make subsitutions, change the amounts - really anything goes.

STEP 1
Boiling water. Once boiled, add noodles - cook until tender. 
If you want them out of the water sooner than they are done for some reason, that is fine because they will continue to cook in the oven. Oh! Pre-heat oven to 375 F.


STEP 2:
Grill chicken breast - I just do it on a little George Foreman grill, but you could even cook it in the oven - it doesn't have to be grilled, it just adds a bit more flavour.


STEP 3:
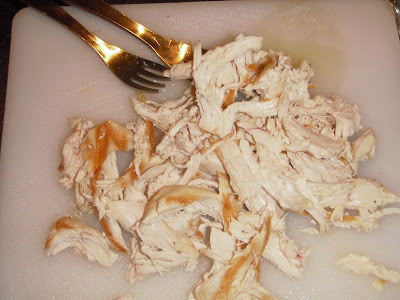
Let chicken cool for 5 minutes so the juice reabsorbs. Then shred apart. I like to use two forks.


STEP 4: Picture missing - forgot to take one I guess!
Make the sauce.
Bring to a boil the diced tomatoes and liquid, tomato paste, onion, pepper, and herbs (only use half of the parlsey, use the rest for garnish). Once boiled, dropped down to a simmer and allow the sauce to thicken.

STEP 5:
Assemble.
Lay out each noodle. Add a few pieces of cheese to help everything stick together. 
Add a layer of sauce, then several pieces of chicken and some more cheese.


STEP 6:
Roll each one up. You'll be so proud of yourself. I know I was!
 Missing a picture again - but you get the idea I'm sure.

STEP 7:
Place in oven safe dish and add a dollip more of sauce to the top of each roll. Add the remaining
cheese - can't ever be too generous - pile it on!


STEP 8:
Place in oven for 20-30 minutes at 375 F. Just monitor it, you really just want it to set and have the cheese crisp up a bit.


STEP 9:
Garnish and plate it up for your man! (or whom ever!)


Enjoy!! Let me know how yours turns out!


Sunday 29 April 2012

Here I Am

WOW! So here I am - writing my very first blog entry! I have been meaning to create one for quite some time now and after a couple of times sitting down and being faced with all the codes and scripts, I finally realized that it wasn't too daunting afterall - and it was actually quite quick to put together!

My motivation to put together this blog is that I feel I have so much to share! My boyfriend and I recently bought a place and we are slowly but surely making it our own. It is with this transition that I have been much more involved in baking and cooking and small projects around the house. With Pinterest and the huge array of other people's blogs, inspiration has definitely kicked in. I am going to post the process and results of many of these here to share with you.

I hope that you will find my blog - Wilma: Loft Living - at the least useful for your own inspiration and hopefully entertaining as well.

In the coming weeks I hope to start filling up the categories with posts. Revisit as often as you can!

Stay tuned.